Jump to content

Sheaffer plunger filler


MT4

Recommended Posts

Hi all,


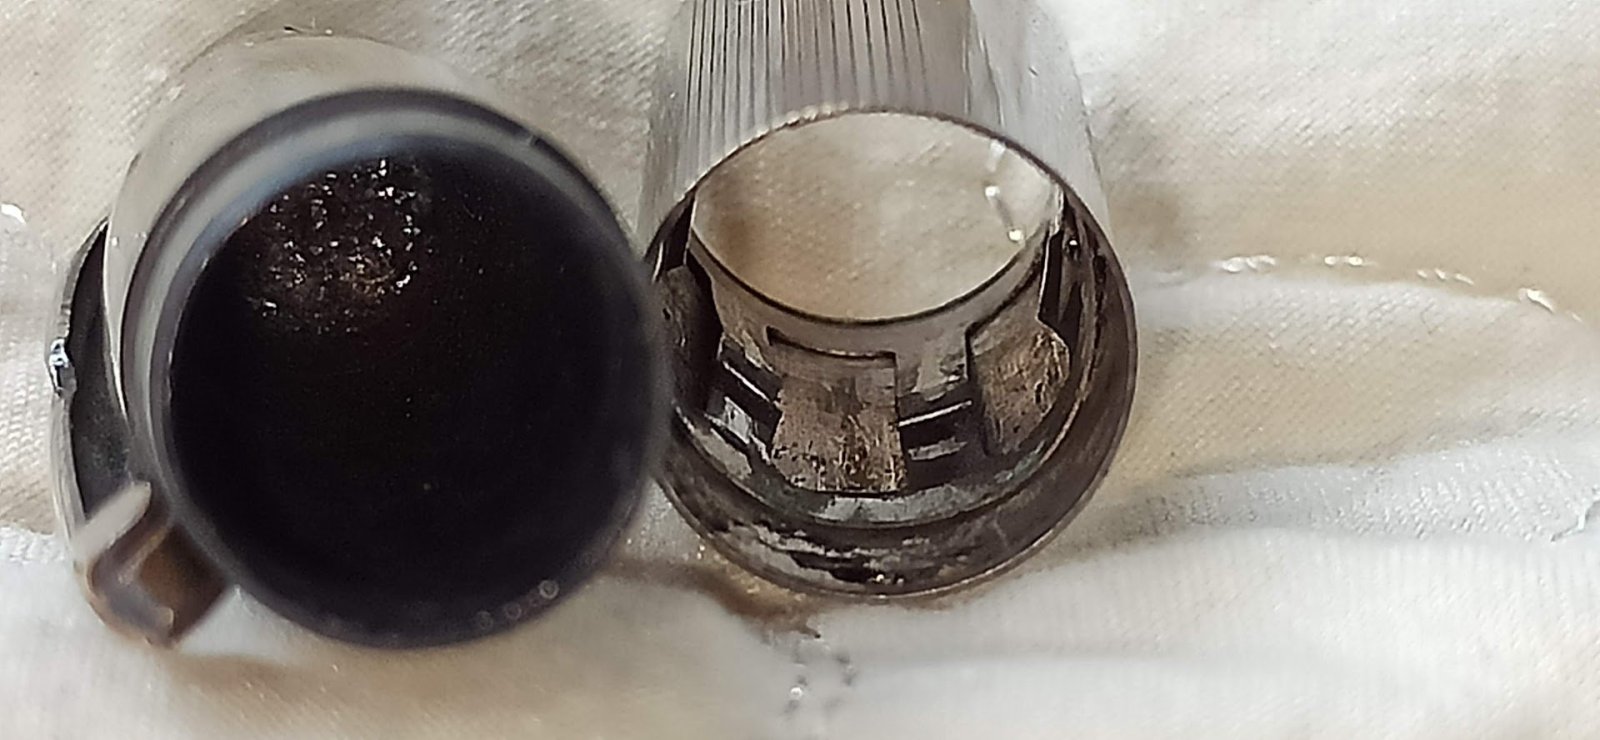
I have bought a Sheaffer plunger filler. It seems to be a Valiant (though I am not sure about it). It is in a great shape, generally speaking, but it doesn't seem to suck enough ink. I have disassembled it (except for the union between body and section), cleaned it, and would like to know how to proceed right now. Should I stuck more in the top assembly? Should I change the "piston" part? It seems so, it is quite worn out. If so: What should I use to? How do I disassemble the tip? Is it screwed, sticked, melted?


So many questions... sorry if I have bored you with the above.


As usual, whoever finds the pictures useful can use them without any further notice, I am the author.


Thanks in advance.


Martin


post-4069-1237208327_thumb.jpgpost-4069-1237208345_thumb.jpg

In case of emergency: Just shout loud and run as fast as you can.


http://groups.yahoo.com/group/lafeyplumas/ group for enthusiasts in Argentina. Subscription is moderated, messages aren't.

Link to comment
Share on other sites

  • Replies 21
  • Created
  • Last Reply

Top Posters In This Topic

  • MT4

    11

  • gmberg

    3

  • fountainbel

    2

  • psfred

    2

Top Posters In This Topic

Posted Images

Well, the pen should not have come apart as you have shown it, so that is probably one part of your issues. The back end threaded collar which the blind cap threads to should be captive in the barrel, not free as you have shown. But, replacing the packing will be much easier now at least. You need to get the correct O ring from Vintagepens.com and replace the felt and rubber washers you see on the back end of the plunger rod with the O ring. Then you will need to replace the threaded collar back into the butt of the barrel, most likely it will need to be solvent welded back into place if it came out easily. The flat round washer which is sliding on the plunger rod seals the packing unit at the back end of the barrel, so it does not need to be replaced.


The material to replace the plunger washer at the front of the plunger rod is available from Ron Zorn and Richard Binder. I have the material as well, but do not sell it at this time. A concentric punch set is required to cut the washer with the correct outer diameter and then to punch a hole for the plunger rod in the center of the material. The tooling is available from Francis Goosens here on FPN. The plunger washer is captured between the pointed piece at the front and the disk with the tapered edge on it. Take note of the direction of the taper on the support disk, it only works as shown.


Lube the plunger washer with silicone grease (local dive shop is a good source for this) and lube the plunger as well. A light coating is fine, this stuff goes a long way.


If this sounds a little too involved, then send it off to a pen restorer and you should have a nice little writer there in short order.


Cheers,

Sean

PenRx is no longer in business.

Link to comment
Share on other sites

Many thanks for your answer. Please find my comments inserted into yours:


Well, the pen should not have come apart as you have shown it, so that is probably one part of your issues. The back end threaded collar which the blind cap threads to should be captive in the barrel, not free as you have shown.
I should have mentioned that I have pulled it with a tube from the inside (once I got out the nib assembly). It was quite stubborn, but I guess I am even more...

But, replacing the packing will be much easier now at least. You need to get the correct O ring from Vintagepens.com and replace the felt and rubber washers you see on the back end of the plunger rod with the O ring.
My main issue with that is that both ends of the "stick" are still assembled. The top part (the one that ends up inside the blind cap) has a small plastic ball. I haven't yet figured out whether it is sticked, welded, or screwed in the metal "wire". The bottom part (the one with the rubber and the rigid plastic washer)... well: The same comments as the other end applies.

Then you will need to replace the threaded collar back into the butt of the barrel, most likely it will need to be solvent welded back into place if it came out easily.
OK. I wasn't aware that such a strength was required. I was thinking on cementing it with shellac. Thanks for the advice
The flat round washer which is sliding on the plunger rod seals the packing unit at the back end of the barrel, so it does not need to be replaced.


The material to replace the plunger washer at the front of the plunger rod is available from Ron Zorn and Richard Binder. I have the material as well, but do not sell it at this time. A concentric punch set is required to cut the washer with the correct outer diameter and then to punch a hole for the plunger rod in the center of the material. The tooling is available from Francis Goosens here on FPN.

Small orders are quite a thing for me, as I live about 7000 miles away from the US. I'll try locally first and, if I can't get the things I need, I will try with the suppliers you adviced
The plunger washer is captured between the pointed piece at the front and the disk with the tapered edge on it. Take note of the direction of the taper on the support disk, it only works as shown.


Lube the plunger washer with silicone grease (local dive shop is a good source for this) and lube the plunger as well. A light coating is fine, this stuff goes a long way.

Thanks for that, too. I didn't notice it was just one side right.
If this sounds a little too involved, then send it off to a pen restorer and you should have a nice little writer there in short order.


Cheers,

Sean


Thanks again.


Martin

In case of emergency: Just shout loud and run as fast as you can.


http://groups.yahoo.com/group/lafeyplumas/ group for enthusiasts in Argentina. Subscription is moderated, messages aren't.

Link to comment
Share on other sites

There are two methods to attach the "wire" to the blind cap. One is simply a knob of celluloid, the other is a knob retained in the blind cap by a small screw fitting. You will need to make a bent fork of some kind to unscrew the latter to free the rod. However, since you have the hard part done (getting the filler seal out of the barrel in the first place), all you really need to do is use some gentle heat on the bit at the washer to get it to unscrew. 120F, no more or it will melt instead of loosen.


You will need to remove both parts, make sure you put them back later the same way they are not. Remove the old rubber and felt packing and replace it with one of Dave Nishamura's seals (contact him for the size if you want to get it locally -- use fluoropolymer or buna, not butyl rubber). You will have to replace the piston seal as well. You may need a small shim inside the seal housing to keep the o-ring compressed, too. Usually they are drilled out from the section end and a new washer is solvent welded into the housing, but since you have it out, I'd use the original parts. Might be able to use just a pair of o-rings for that matter.


When you put it together, use a thin coat of shellac to seal the housing for the plunger seal into the barrel. Do NOT solvent weld it in place with MEK or acetone, it will no longer be removable, and shellac will hold it just fine.


I'm hoping mine come apart that easily from the back -- I don't really want to take the nibs off.


Peter


Link to comment
Share on other sites

Thanks. In this case we have a knob at the top end of the rod, and a retaining ring keeps this knob to the blind cap. I have already disassembled this, but I don't know how to get either end of the rod clean, so as to insert the O rings or whatever is needed inside the packing, or change the piston seal (the one that moves up and down when loading ink).


Rgds.


Martin

In case of emergency: Just shout loud and run as fast as you can.


http://groups.yahoo.com/group/lafeyplumas/ group for enthusiasts in Argentina. Subscription is moderated, messages aren't.

Link to comment
Share on other sites

The "knobs" at the ends of the shaft should unscrew from the threaded ends of the shaft. You will need to apply heat to the knobs as they are often sealed with shellac. You will need 140 F to soften the shellac.


I also advise sealing the packing unit into the barrel with shellac. If you solvent weld it, it will be the last time you repair the pen - at least without removing the nib; which is difficult with Triumph nibs.


Good luck with your pen

May we live, not by our fears but by our hopes; not by our words but by our deeds; not by our disappointments but by our dreams.

Link to comment
Share on other sites

The "knobs" at the ends of the shaft should unscrew from the threaded ends of the shaft. You will need to apply heat to the knobs as they are often sealed with shellac. You will need 140 F to soften the shellac.


I also advise sealing the packing unit into the barrel with shellac. If you solvent weld it, it will be the last time you repair the pen - at least without removing the nib; which is difficult with Triumph nibs.


Good luck with your pen


Thanks for this. In this particular case the weird thing is that the nib/feed assembly unscrewed easily, but the section seems to be fixed.


I was quite reluctant to disassemble the knob. Looks quite weak (at least compared to the steel rod). I'll try with heat, then.


Rgds.


Martin

In case of emergency: Just shout loud and run as fast as you can.


http://groups.yahoo.com/group/lafeyplumas/ group for enthusiasts in Argentina. Subscription is moderated, messages aren't.

Link to comment
Share on other sites

Hi again,


Just as a summary, and to be sure that I haven't misunderstood anything:


a- I should unscrew 1, make or get a washer to replace 2. Questions: Washer has to be cut from either Buna or Fluoropolymer. I've already got some surprised faces with these name. Isn't "synthetic rubber" a name for Buna? Do sheets of Buna have other uses? Just to be sure where to get the sheets. Isn't Teflon a commercial name for fluoropolymer?

b- I should pack as much felt as possible inside 5. Does it have to be damped with silicon grease? Do I have to insert small O rings on both sides of 5 (against both 4 and 6)? Do I have to seal 4 to 6 somehow?

c- I should unscrew 8 from 9.

d- I should shellac 6 outer surface to the inside of the pens body.

e- Blind cap has some free play, even with 7 screwed as much as possible into it. Should I thicken 8 somehow in order to solve this? Or this free play is just normal? I kind of wasn't expecting it.


Thanks to everyone, once more.


As usual, I am the author of the picture, and I don't have any problem of anyone reproducing it wherever is useful.


Rgds.


Martin


post-4069-1237679149_thumb.jpg

In case of emergency: Just shout loud and run as fast as you can.


http://groups.yahoo.com/group/lafeyplumas/ group for enthusiasts in Argentina. Subscription is moderated, messages aren't.

Link to comment
Share on other sites

a- I should unscrew 1, make or get a washer to replace 2. Questions: Washer has to be cut from either Buna or Fluoropolymer. I've already got some surprised faces with these name. Isn't "synthetic rubber" a name for Buna? Do sheets of Buna have other uses? Just to be sure where to get the sheets. Isn't Teflon a commercial name for fluoropolymer?

b- I should pack as much felt as possible inside 5. Does it have to be damped with silicon grease? Do I have to insert small O rings on both sides of 5 (against both 4 and 6)? Do I have to seal 4 to 6 somehow?

c- I should unscrew 8 from 9.

d- I should shellac 6 outer surface to the inside of the pens body.

e- Blind cap has some free play, even with 7 screwed as much as possible into it. Should I thicken 8 somehow in order to solve this? Or this free play is just normal? I kind of wasn't expecting it.


Martin:

First, let me thank you for that beautiful pic with the parts numbered. The next PENnant will carry an article by me on plunger-filler restoration, and if I had seen that pic before the article went to press, I would have asked for your permission to use it. Bravo!


a- Small sheets of Buna-N of exactly the right thickness and flex are available from Rob Zorn and Richard Binder. Of course you do need the right size punches to make a washer from it, and those tend to be expensive. An alternative is to order pre-cut washers (size E) from Victor Chen at Penopoly.

b- Throw away the felt discs and the rubber wahsers on either side. Instead, pack in an o-ring and closing washer available from David Nishimura at Vintage Pens.

c- all parts need to be taken off the rod so you can remove the rod from the packing unit (6), replace the flexible washer at the other end, and re-insert the rod AFTER the packing unit is sealed in place.

d- This gets a bit tricky. First the black hard closing washer needs to be seated inside the barrel on the ledge provided for it, then the packing unit inserted to rest upon it. The unit needs to be seated and sealed correctly in order to work. I can give you some more tips on this if you get in touch by e-mail: gberg@sbc.edu.

e- You want play in the blind cap. That's the way it was designed. It allows the rod some leeway while allowing the blind cap to be screwed down tightly.

Do feel free to get in touch by e-mail for more details (gberg@sbc.edu).

Cheers,

Gerry Berg

Link to comment
Share on other sites

Hi Martin,

Please find below some answers to your specific questions in BOLD

Wishing you success !

Francis


Hi again,


Just as a summary, and to be sure that I haven't misunderstood anything:


a- I should unscrew 1, make or get a washer to replace 2. Right Questions: Washer has to be cut from either Buna or Fluoropolymer. I've already got some surprised faces with these name. Isn't "synthetic rubber" a name for Buna? Do sheets of Buna have other uses? Just to be sure where to get the sheets. Isn't Teflon a commercial name for fluoropolymer? Buna N, nitrile rubber is a copolymer of butadiene and acrylonitrile . Fluoropolymer is better known under the commercial name VITON. Both materials are relatively easily commercial available. You need a thickness of arround 0.7- 0.8mm, and a 60-70 shore hardness

b- I should pack as much felt as possible inside 5. Does it have to be damped with silicon grease? Do I have to insert small O rings on both sides of 5 (against both 4 and 6)? Do I have to seal 4 to 6 somehow? The special fabricated O ring , inner diameter 1.5x 2.5 section -is sold exclusively by David Nishimura; You will be able to install a 1mm thick felt behind the O ring. Impregnate the felt ring in silicone grease before installation

c- I should unscrew 8 from 9. Right

d- I should shellac 6 outer surface to the inside of the pens body. Right

e- Blind cap has some free play, even with 7 screwed as much as possible into it. Should I thicken 8 somehow in order to solve this? Or this free play is just normal? I kind of wasn't expecting it.An axial backlash of 0.5 mm it normal, and is no poblem at all

Thanks to everyone, once more.


As usual, I am the author of the picture, and I don't have any problem of anyone reproducing it wherever is useful.


Rgds.


Martin

Edited by fountainbel
Link to comment
Share on other sites

Hi all,


Thanks to the good advice I've got from this list, I have got some Buna N. I have had some trouble in the meantime (most shops selling rubber products don't carry Viton or Buna sheets or stripes) but finally got the minimum order... 3 pounds (about a 3ft square!!) of Buna (Viton is just out of what shops around here carry). I now have marginally over :roflmho: what is required for both the disc and a few tries. As I don't have the puncher (hole cutter), I am just going to cut it with a scissors and finish it in my Dremel (against an abrassive surface).


Something that might put to a good use part of the excedent is the following: Would it be possible to cut a few discs, stack them, and use them to replace the felt? Sorry if this sounds too obvious for some of you, but I am not a technician or anythinng, but this kind of material seems to be able to stand pressure and wear quite well (as it is used for the moving thisk at the end of the rod).


Though it might seem that I am not good at following advice, it is not the case. It is just that I don't have easy access to things sold in the US. Though I buy every now and then, both the delay and cost of shipping is quite big against the real value of the order. I am not in any way against Nishimura's propriate O ring, just trying to go the easiest way round here.


Thanks


Martin

In case of emergency: Just shout loud and run as fast as you can.


http://groups.yahoo.com/group/lafeyplumas/ group for enthusiasts in Argentina. Subscription is moderated, messages aren't.

Link to comment
Share on other sites

Hi,


Thanks to all the pen is currently working OK. I've decided to replace the felt with small discs made out of Buna N and some silicon grease in-between them. Then shellacked the unit to the body and... Voilà!! Nice and crisp POP sound when you go with the shaft down!


Rgds.


Martin

In case of emergency: Just shout loud and run as fast as you can.


http://groups.yahoo.com/group/lafeyplumas/ group for enthusiasts in Argentina. Subscription is moderated, messages aren't.

Link to comment
Share on other sites

For what it's worth, and for future reference, both Richard and I sell the high grade buna-N rubber that I found last summer. It's thickness is within 0.001" of what Sheaffer used in these pens, which is an unusual size. A 4" square piece is $10, three for $25. You should be able to punch over 90 of the small head gaskets from one sheet if done carefully.


It's also worth noting that not all buna-N is created equal, even though they have the same description.

spacer.png
Visit Main Street Pens
A full service pen shop providing professional, thoughtful vintage pen repair...

Please use email, not a PM for repair and pen purchase inquiries.

Link to comment
Share on other sites

Hi all,


I have just tested this with plain water. It seems to work OK (The filling system, I mean, as some nib smoothing / tine alignment seems to be required; it is quite scratchy. But this is another story).


How much ink is it supposed to load? Mine fills up to about halfway the translucent part of the body. Is this OK?


Sorry if this is an easy question, this is my first plunger filler.


Rgds.


Martin

In case of emergency: Just shout loud and run as fast as you can.


http://groups.yahoo.com/group/lafeyplumas/ group for enthusiasts in Argentina. Subscription is moderated, messages aren't.

Link to comment
Share on other sites

Hi Martin,

Congratulations on your succesfull repair!


As for the "filling rate", you should take in account that the semi- transparentbarrel part features an enlarged "vacuum release/suction" chamber,

just before the section

Logically the length of this enlarged part is to be deducted for determining the filling rate.


Pull the plunger fully out, measure the opening between the filling knob & barrel end ( being"L1")

Now push the plunger slowly in till the piston seal just enters( pops) in the "vacuum release/suction" chamber.


Measure again the opening between the filling knob & barrel end (being "L2")


The "potential" filling volume is L1-L2

(Purely theoretical you have also to deduct the "L1-L2" volume of the plungerrod)


Depending of several influeencing parameters s.a. dimensional & form precision of the piston seal, ovality of the barrel, sealing efficiency of the plungerrod seal the "effective" filling rate should be between 70 & 90 % of the potential filling rate.

Francis

Edited by fountainbel
Link to comment
Share on other sites

Hi Martin,

Congratulations on your succesfull repair!


As for the "filling rate", you should take in account that the semi- transparentbarrel part features an enlarged "vacuum release/suction" chamber,

just before the section

Logically the length of this enlarged part is to be deducted for determining the filling rate.


Pull the plunger fully out, measure the opening between the filling knob & barrel end ( being"L1")

Now push the plunger slowly in till the piston seal just enters( pops) in the "vacuum release/suction" chamber.


Measure again the opening between the filling knob & barrel end (being "L2")


The "potential" filling volume is L1-L2

(Purely theoretical you have also to deduct the "L1-L2" volume of the plungerrod)


Depending of several influeencing parameters s.a. dimensional & form precision of the piston seal, ovality of the barrel, sealing efficiency of the plungerrod seal the "effective" filling rate should be between 70 & 90 % of the potential filling rate.

Francis


This is taking into consideration not only a rod with a sizeless rod, but the section (not the pen "section" but the hollow section in sq mm) to be equal both in the "vacuum release/suction" chamber and in the narrower part of the body, which is physically impossible.


I've had fun with your formula, BTW. :thumbup: It is nice to put my neurons to work every now and then. Painful, if you are not used to, but worth the effort most of the times.


Rgds.


Martin


In case of emergency: Just shout loud and run as fast as you can.


http://groups.yahoo.com/group/lafeyplumas/ group for enthusiasts in Argentina. Subscription is moderated, messages aren't.

Link to comment
Share on other sites

"Laurence Oldfield (Marshall and Oldfield, Pen Repair, p. 94) reminds users that they should not expect a plunger-filler to fill the entire barrel with ink. After all, the piston head, rod and packing unit do take up space, though less space than other filling systems. Calculating the theoretical limits of the barrel’s capacity and the practical efficiency of the plunger, Oldfield concludes that the barrel can fill only about 2/3 full (private communication , 2 Sept. 2008). Most pens that have been properly restored should look fairly full, at least as seen though the pen’s view window in the barrel which allows the user to view about 2/3 of the barrel. Thus, even with only 2/3 of the barrel full, ink would cover most, if not all, of the visible window. The only exceptions to that are the small Tuckaways with large windows. In those cases the piston head and packing unit take up about half of the barrel volume, and even a perfectly working model would not fill more than 2/3. "


Gerry Berg

from recent Pennant article

Link to comment
Share on other sites

  • 4 months later...
post-4069-1237679149_thumb.jpg


Sorry to bring this thread back to life after such a long time.


I was still juggling with the idea of improving my previous repair, and decided to re-make the #2 piece (piston). I am kind of convinced that something was not working OK, that a better fill could be achieved, and a smoother rod operation could be got. Of course, I have thrown away the old one. :headsmack:


Right now, it sometimes goes down smoothly, but other times it becomes VERY hard indeed. I am either getting too much vacuum, or (just my guess) the lips of this washer (#2 in the picture) are getting trapped between the body walls and piece #3.


Suggestions? How should I test for the right rubber washer (#2) size? Is #3 in the right position, or it is upside down?


Rgds.


Martin

In case of emergency: Just shout loud and run as fast as you can.


http://groups.yahoo.com/group/lafeyplumas/ group for enthusiasts in Argentina. Subscription is moderated, messages aren't.

Link to comment
Share on other sites

Create an account or sign in to comment

You need to be a member in order to leave a comment

Create an account

Sign up for a new account in our community. It's easy!

Register a new account

Sign in

Already have an account? Sign in here.

Sign In Now


×
×
  • Create New...