Jump to content

How To Unscrew A Parker 45 Flighter


Rosso Corsa

Recommended Posts

Hi to all,

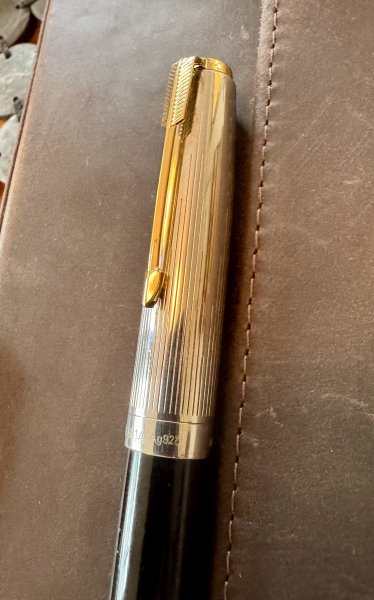
I have a doubt on a Parker 45 Flighter GT I bought a couple of weeks ago. This pen should have been produced in the period 1964 - 1970, I presume.

It is in excellent conditions, as you can see in these photos (the nib was not correctly mounted, I know... but I easily fixed that):

post-106960-0-32373700-1511000553_thumb.jpg

post-106960-0-91966900-1511000574_thumb.jpg

post-106960-0-75338000-1511000591_thumb.jpg


But there is one possible defect in my pen, also if I am not sure about that.

Here is a photo of a Parker 45 Flighter completely disassembled:

post-106960-0-80597500-1511000610_thumb.jpg


In my pen the plastic barrel inner is not glued with the barrel, so it is not possible to unscrew the barrel from the section in the normal way.

The only way to unscrew is to keep the black end cap and rotate the section.

Is that a defect of my pen, so that I have to find a way for joining the barrel inner with the barrel, or keeping the end cap is the right way for unscrewing the section in this specific Parker 45 model?


Thank you very much for your help!


Ciao

Mauro

Edited by Rosso Corsa

Mauro

Link to comment
Share on other sites

  • Replies 20
  • Created
  • Last Reply

Top Posters In This Topic

  • mitto

    7

  • hari317

    5

  • Rosso Corsa

    4

  • alexwi

    2

Top Posters In This Topic

Posted Images

Mauro


Normally you should be able to unscrew the section while holding the metallic barrel.


I feel your diagnosis of glue failure is correct.


Best

Hari

In case you wish to write to me, pls use ONLY email by clicking here. I do not check PMs. Thank you.

Link to comment
Share on other sites

Yes, a glue failure that normally occure because of soaking the barrel in water for extended periods. The solution would be to unscrew the end cap and remove the inner plastic shell from the metal barrel, use shellac on it and reglue it. Let it dry and then reattach the end cap.

Edited by mitto

Khan M. Ilyas

Link to comment
Share on other sites

Yes, a glue failure that normally occure because of soaking the barrel in water for extended periods. The solution would be to unscrew the end cap and remove the inner plastic shell from the metal barrel, use shellac on it and reglue it. Let it dry and then reattach the end cap.

Thank you Khan and Hari or your so fast comments!


When I found this defect I tried to unscrew the end cap (keeping firmly the section), but is seemed blocked. I did not force in order to avoid worse troubles...

Are you sure that the end cap can be unscrewed?


Another time, TY!

Ciao

Mauro

Link to comment
Share on other sites

I also found this very interesting page dedicated to Parker 45 Flighter, where I read:


"Around 1970 Parker also decided to change the black plastic end cap to a chromed one on their standard Flighter or a gold one on their Flighter Deluxe GT.
Late in the 1970’s a change was made to simplify the internal components of the barrel. The Flighter lost its full length plastic internal barrel inner sleeve to be replaced with a short brass threaded insert to screw the Shell Section on to and a small plug at the end of the barrel to screw the end cap to."


Then, perhaps before 1970 (when I believe my pen was produced) it was not possible to unscrew the end cap. But I am not sure I correctly interpreted the sentences above...


Ciao

Mauro

Mauro

Link to comment
Share on other sites

I also found this very interesting page dedicated to Parker 45 Flighter, where I read:


"Around 1970 Parker also decided to change the black plastic end cap to a chromed one on their standard Flighter or a gold one on their Flighter Deluxe GT.

Late in the 1970s a change was made to simplify the internal components of the barrel. The Flighter lost its full length plastic internal barrel inner sleeve to be replaced with a short brass threaded insert to screw the Shell Section on to and a small plug at the end of the barrel to screw the end cap to."


Then, perhaps before 1970 (when I believe my pen was produced) it was not possible to unscrew the end cap. But I am not sure I correctly interpreted the sentences above...


Ciao

Mauro

Since you are able to unscrew the section by holding onto the black end cap, you have the version with the full length plastic insert similar to the pen you have shown disassembled in the picture.

In case you wish to write to me, pls use ONLY email by clicking here. I do not check PMs. Thank you.

Link to comment
Share on other sites

I also found this very interesting page dedicated to Parker 45 Flighter, where I read:


"Around 1970 Parker also decided to change the black plastic end cap to a chromed one on their standard Flighter or a gold one on their Flighter Deluxe GT.

Late in the 1970s a change was made to simplify the internal components of the barrel. The Flighter lost its full length plastic internal barrel inner sleeve to be replaced with a short brass threaded insert to screw the Shell Section on to and a small plug at the end of the barrel to screw the end cap to."


Then, perhaps before 1970 (when I believe my pen was produced) it was not possible to unscrew the end cap. But I am not sure I correctly interpreted the sentences above...


Ciao

Mauro

Yes, but yours is the first generation wherein the inner shell in the barrel is the one that you have shown in the image.


Use dry heat on the end cap before trying to unscrew it. Since the inner plastic barrel has unglued it would spin when you try to unscrew the end cap. To prevent it from spinning you have to insert some corresponding size flat ended rod / wooden piece inside and put a bit pressure on it while at the same time gently unscrewing the end cap.

Best.


Edit:

Soaking the end cap before trying the use of dry heat (hair drier) may be helpfull. Also you may need multiple applications of dry heat before the end cap gives in. Don't rush things. Be patient and cool while undertaking the operation. :)

Edited by mitto

Khan M. Ilyas

Link to comment
Share on other sites

I found the following in an old Parker service manual


fpn_1511094903__31282070-ff92-4129-bb77-


The screw threads appear to be of left hand type. Following is the detailed view:


fpn_1511094959__a235d254-cb03-4ca0-8d68-


A left hand screw is tightened by rotating it counter clockwise.


HTH.

Edited by hari317

In case you wish to write to me, pls use ONLY email by clicking here. I do not check PMs. Thank you.

Link to comment
Share on other sites

I don't think the threads are left hand type. I have first hand experience of once unscrewing the end cap on the old type / early version P45 flighter. And, whiIe I don't remember exactly as to whether the threads were left hand or right hand type but the very fact that I did not take any serious note of the threads reinforces the probability that the threads were right hand type as otherwise being something new I would have taken note of it and would have remembered it. Yet, there are chances your guess is right and my memory is failing me.

I found the following in an old Parker service manualfpn_1511094903__31282070-ff92-4129-bb77-

The screw threads appear to be of left hand type. Following is the detailed view:fpn_1511094959__a235d254-cb03-4ca0-8d68-

A left hand screw is tightened by rotating it counter clockwise.

HTH.

I don't think the threads are left hand type. I have first hand experience of once unscrewing the end cap on the old type / early version P45 glifhter. And, whiIe I don't remember exactly as to whether the threads were left hand or right hand type but the very fact that I did not take any serious note of the threads reinforces the probability that the threads were right hand type as otherwise being something new I would have taken note of it and would have remembered it. Yet, there are chances your guess is right and my memory is failing me.

Edited by mitto

Khan M. Ilyas

Link to comment
Share on other sites

The second picture seems to show a left hand thread. Have a look at it. Maybe it is a drawing error. Who knows.

Yes, hari. I have looked at it closely but as you say it might be (OR MIGHT NOT BE) a drawing error.

Edited by mitto

Khan M. Ilyas

Link to comment
Share on other sites

The Parker manual in my possession does not speak of glue. Old field and marshal dont speak of glue in their book either. Was the barrel insert really glued or simply held in place by the tassie? The second picture also shows notches at the base of the screw. This would suggest the barrel had some mating projections which would prevent rotation. Once the insert notches or barrel projections are damaged, the insert would begin to rotate.

In case you wish to write to me, pls use ONLY email by clicking here. I do not check PMs. Thank you.

Link to comment
Share on other sites

No, I did not see dried up glue or shellac on the threads. But it was pretty tight fit. I advised use of dry heat for the purpose of expending the tassie and not for melting the glue/shellac.


Of interest might be that out of curiosity (me being always curious and explorative :) ), I removed the collectors from the sections of a early production USA made 45 and of a English made Insignia 45. And I found out that not only both were different in fins design but the collector of the USA made pen was threaded and hence screwed while the English one was press fit and hence shellaced.

Details here:


https://www.fountainpennetwork.com/forum/topic/314018-first-generation-thin-feed-p75-collector/?do=findComment&comment=3724767


Collector in the early thin feed P75 section may also be seen in the linked thread.

Edited by mitto

Khan M. Ilyas

Link to comment
Share on other sites

Ty all for these so detailed an useful comments!


I shall proceed as suggested for unscrewing the black rear plastic cap, but in any cases I wont force this operation. In the end I can easily unscrew the section keeping firmly the rear black plastic cap, and the fact that the metal barrel is not joined with the plastic barrel inner does not cause any problems in writing.

So, a wise decision could be to avoid any forced operation that could cause much worse issues... :-)


Ciao

Mauro

Mauro

Link to comment
Share on other sites

I remember having a Parker 45 Consort with a chrome barrel tassie, and I'm sure I unscrewed mine the normal way.


Obviously something has gone wrong with the way this barrel liner sits inside the barrel. I'm not sure they were ever glued together and favour the likelihood that there was some sort of projection at the end, that prevented the barrel liner from spinning.


if it was my pen, I would take it apart and find out what had happened to the keying projections. In the event that they have failed, I would glue the barrel liner inside the barrel with epoxy resin and not shellac, since shellac will undoubtedly fail as the barrel screw threads are repeatedly unscrewed and tightened.

Link to comment
Share on other sites

  • 4 months later...

So the barrel liner is glued as well the threaded end cap. And hence use of heat would be necessary to remove the two.

Khan M. Ilyas

Link to comment
Share on other sites

  • 2 years later...

Hi. Maybe the Parker's Service Manual can explain some doubts...


Hi,


Anyone has a link to this service manual? Seems to be newer than the one I have, which is similar but doesn't have such instructions for disassembling a 45.


Thanks!


Alex

Edited by alexwi

---------------------------------------------------------

We use our phones more than our pens.....

and the world is a worse place for it. - markh

Link to comment
Share on other sites

Okay -- how many owners of 45s have removed/installed nibs without applying some special wax to the collar threads? How many have touched the back end of the feed with bare fingers? How many have not done whatever that stress releasing process is?


Or maybe I should ask the opposite -- I suspect there would be a lot fewer affirmative responses for "have applied wax", "have not touched back of feed", "have applied stress release procedure"...

Link to comment
Share on other sites

Create an account or sign in to comment

You need to be a member in order to leave a comment

Create an account

Sign up for a new account in our community. It's easy!

Register a new account

Sign in

Already have an account? Sign in here.

Sign In Now


×
×
  • Create New...