Jump to content

MB220: under the hood pictures


hari317

Recommended Posts

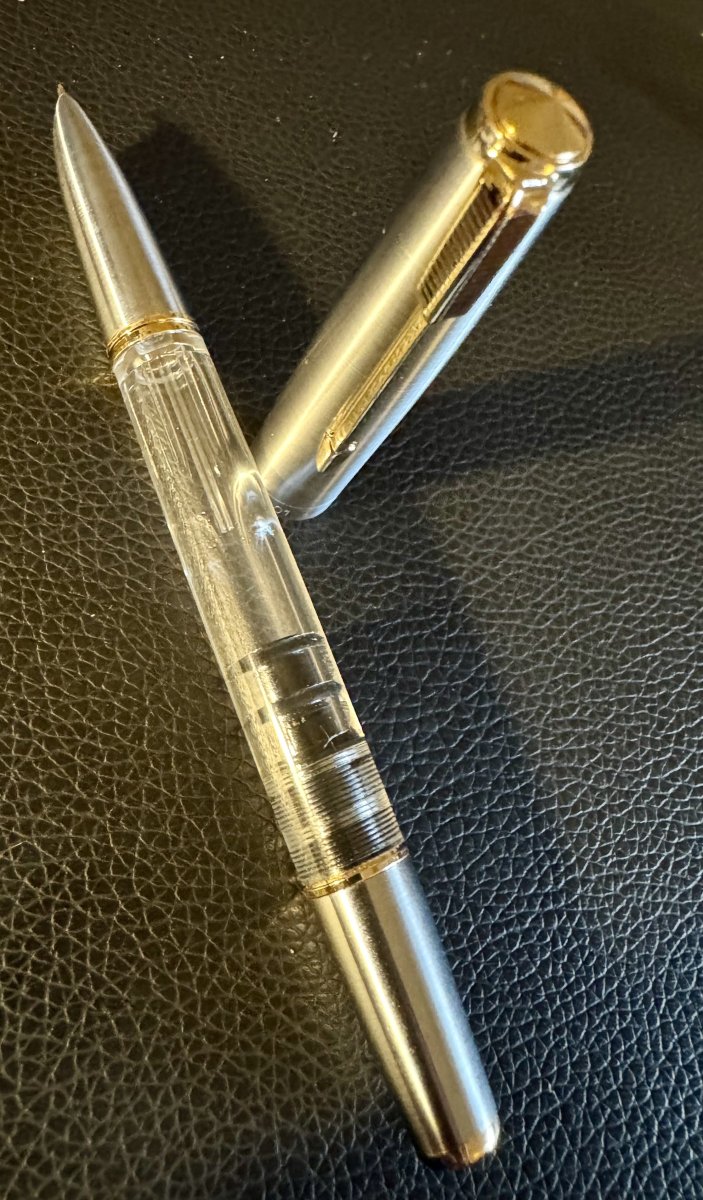
I received this MB220 in the mail today. I am fond of the pens that MB made in the 70s in the brushed finish, I am trying to collect the variants and I already have the MB224 (brushed GP cap) and bought this MB220 last week from a Japanese Dealer. This dealer shows photos of the pens he sells disassembled, as I had suspected, the piston was incredibly stiff since the pen was put together with no lubricant. I took the pen apart and took the chance to photograph the steps.


The design of these pens is impressive. No tools are required to take the pen apart.


The pen capped:

http://i264.photobucket.com/albums/ii197/hari317/MB220/IMG_4205.jpg


The pen uncapped:

http://i264.photobucket.com/albums/ii197/hari317/MB220/IMG_4207.jpg


The first step is to unscrew the section: The cap is held by the ink view window that has grooves to hold the clutch spring.

http://i264.photobucket.com/albums/ii197/hari317/MB220/IMG_4208.jpg


The ink view window will slide off, once the section is unscrewed fully.

http://i264.photobucket.com/albums/ii197/hari317/MB220/IMG_4210.jpg


http://i264.photobucket.com/albums/ii197/hari317/MB220/IMG_4209.jpg


The second step is to remove the ink reservoir sleeve. The piston runs inside this sleeve and the barrel is just a cover. This design also ensures an annular air volume between the barrel and the ink reservoir that acts as an insulator for heat transfer. The ink reservoir sleeve will unscrew from the barrel. MB uses a sealant at this location, be careful, do not apply excessive torque.


Normal position of sleeve:

http://i264.photobucket.com/albums/ii197/hari317/MB220/IMG_4211.jpg


Sleeve unscrewed, Normal RH threads:

http://i264.photobucket.com/albums/ii197/hari317/MB220/IMG_4212.jpg


The sleeve removed:

http://i264.photobucket.com/albums/ii197/hari317/MB220/IMG_4213.jpg


Now the piston can be extracted. Unscrew the filling knob from the rear of the pen, the piston will appear from the front:

http://i264.photobucket.com/albums/ii197/hari317/MB220/IMG_4214.jpg


The piston will come out completely:

http://i264.photobucket.com/albums/ii197/hari317/MB220/IMG_4215.jpg


The piston, barrel and the filler knob with integrated spindle:

http://i264.photobucket.com/albums/ii197/hari317/MB220/IMG_4217.jpg


Closeup of the filler cone and the piston, note that the seal is similar to the latest seals used by MB for their 149/146. Diameter is much smaller:

http://i264.photobucket.com/albums/ii197/hari317/MB220/IMG_4218.jpg


Note the anti-rotation "piston rod guide" in the picture below(component between the piston and the barrel): Note the orientation.

http://i264.photobucket.com/albums/ii197/hari317/MB220/IMG_4219.jpg


A closeup of the guide: The outer slots help locate this inside the barrel and keep this component itself from rotating.

http://i264.photobucket.com/albums/ii197/hari317/MB220/IMG_4220.jpg


A closeup showing the guiding grooves for the piston rod.

http://i264.photobucket.com/albums/ii197/hari317/MB220/IMG_4221.jpg


After rinsing the sleeve and the piston seal well, carefully dry these parts(ensure that there is no moisture inside the hollow piston rod). Apply a thin coat of silicone grease on the piston seal and some pure silicon oil on the spindle(I use the oil sold by Philips for the plastic gears on their taperecorders).


Now insert the piston rod fully into the sleeve and run it up and down a few times gently by hand to coat the sleeve inside wall. Now insert the piston rod fully as far as it will go.


Insert the anti rotation guide into the barrel and ensure that its slots are aligned with the key ways inside the barrel. Now screw in the filler cone from the rear so that only 3 threads are visible. Insert the sleeve with the inserted piston rod from the front gently, the filler spindle with engage with the piston rod inside, now screw down the filler cone fully, it will pull the piston rod down as you screw it in. Now screw the sleeve into the barrel. Caution: only finger tight! Operate the piston with filler cone to check that the piston movfes smoothly and has a full stroke. You can check suction by holding a moist finger sealing the sleeve orifice while withdrawing the piston.


Now apply silcone grease sparingly to the threads on the sleeve that engage the section, now carefully lower the ink view window with clutch spring onto the sleeve. Screw down the section onto the sleeve, do not overtighten. In case the clutch spring protrusions bother you, you can always re-orient them so that they stay out of your grip!


Check the piston operation, use water for first fill to check that all is well. Yes, all was well when I put everything back together.


A final photo showing the two cousins side by side.

http://i264.photobucket.com/albums/ii197/hari317/MB220/IMG_4222.jpg


Best,

Hari

In case you wish to write to me, pls use ONLY email by clicking here. I do not check PMs. Thank you.

Link to comment
Share on other sites

  • Replies 40
  • Created
  • Last Reply

Top Posters In This Topic

  • hari317

    15

  • MCN

    5

  • English John

    4

  • daffie

    4

Top Posters In This Topic

Posted Images

that's awesome. thanks for showing that. i've always wondered what the insides of the piston fillers looked like. very similar to a piston converter but a bit bigger and a bit nicer.


very cool.

Link to comment
Share on other sites

Correct me if I am wrong but doesn't picture 5 show that the ink reservoir ring was destroyed in removal? It looks rather bent to my eye. Did you have a new one and are they readily available?

A proud member of the Pittsburgh Fountain Pen Club

Fall Down 7, Stand Up 8

Link to comment
Share on other sites

Correct me if I am wrong but doesn't picture 5 show that the ink reservoir ring was destroyed in removal? It looks rather bent to my eye. Did you have a new one and are they readily available?


Nope, that is the three pointed clutch spring for holding the cap, and that is its normal shape. This spring is snapped onto the top of the ink view window. AFAIK, None of the parts are easily availble so if you decide to work on your pens, factor this risk.


Best,

Hari

In case you wish to write to me, pls use ONLY email by clicking here. I do not check PMs. Thank you.

Link to comment
Share on other sites

By golly, you are both indeed right. I stand (and sit) corrected!

A proud member of the Pittsburgh Fountain Pen Club

Fall Down 7, Stand Up 8

Link to comment
Share on other sites

I have a Cartridge 220, could you post a picture on how to remove the nib?

The sword is mightier than the pen. However, swords are now obsolete whereas pens are not.


-Unknown

Link to comment
Share on other sites

I have a Cartridge 220, could you post a picture on how to remove the nib?


Does it have the brushed section like this one? If yes, then the nib is inset type and I have not yet figured how to remove it, never needed to adjust the nibs so never tried removing. However if the section is smooth, not brushed, then it can be removed by pushing from the front after unscrewing the section. the nib and feed will come out together.


Best,

Hari

In case you wish to write to me, pls use ONLY email by clicking here. I do not check PMs. Thank you.

Link to comment
Share on other sites

Many thanks indeed. Your tutorials are very well detailed!

Cheers,

Daniel

Quan el centre del món no ets ben bé tu (per més que en tinguis la il·lusió),

si et desvetllaven enmig de la nit, no vulguis preguntar-te per què vius:

distreu-te rosegant l'ungla d'un dit. [I beg your pardon, Salvador Espriu]

Link to comment
Share on other sites

Very cool Hari. I have a small collection of these and love every one. You are right about the design and means of disassembly. It is fantastic and well thought out. Perhaps we will never see another pen like this again.


One of the things that drives me crazy about these is the small star at the end of the barrel. On a few of the examples I have they do tend to fall out and it is not unusal to find them missing.

Link to comment
Share on other sites

:thumbup: nice pens :clap1: I wish that the 149 was available in brushed steel

Pens are like watches , once you start a collection, you can hardly go back. And pens like all fine luxury items do improve with time


Link to comment
Share on other sites

Thanks, Hari. That's an excellent post.


Nice engineering and design. Strip-down and rebuild done without tools, too. Very impressive.


(Edited to correct early morning spelling.)

Edited by CS388
Link to comment
Share on other sites

Very interesting, thanks for the guide


I have just got one of these recently , and it has a great springy nib.

Montblanc British Racing Green shows off well it it !


The section on mine doesn't have the smooth shiny finish near the nib, but is identical otherwise.


I now have a Lamy 2000 on order to compare the finishes !


I would love to see some more of the variants/ cousins of this pen.


Cheers


John

Link to comment
Share on other sites

The section on mine doesn't have the smooth shiny finish near the nib, but is identical otherwise.


John, do you have a photo of the section on your pen? I have seen only two section types:


  •  
  • Totally smooth, the section is just a hood, the nib and feed will slide off.
  • Brushed as my pen, nib is inset to the section.


Regards,

Hari

In case you wish to write to me, pls use ONLY email by clicking here. I do not check PMs. Thank you.

Link to comment
Share on other sites

Here are a couple of pics which give you the idea.

Sorry about the quality

There is a slight line on the section - just ink.

As you can see, the section is textured all the way to the nib

http://i827.photobucket.com/albums/zz194/english_john/003-1.jpg

http://i827.photobucket.com/albums/zz194/english_john/005.jpg


I think there was a review recently - I will have a look at that one as well.

You may see my thread about having one of these in the seventies - well I thought my memory was wrong,

but it could be that there are slight variations


Cheers

John


P.S. It may look sunny , but it is only 11 degrees here Hari

Link to comment
Share on other sites

John, Thanks for the pics, I really like this variant(not so fond of the smooth section, looks out of place on a brushed pen). It looks identical to the fully smooth section, only that this is fully brushed. The major difference is in the way the nib is attached. Pls correct me if I am wrong, In your pen the nib level is lower than the level of the section, so with the section unscrewed, the nib and feed will comeout from the wider end of the section, if pushed from the front.


In the inset type section that I have shown, the nib and the section are at the same level and I am quite certain that the nib has to be pulled towards the front to slide it off the section. The feeder also, I believe, is fused to the section. I took some pictures of the nib and feed:

http://i264.photobucket.com/albums/ii197/hari317/MB220/IMG_4235.jpg


http://i264.photobucket.com/albums/ii197/hari317/MB220/IMG_4236.jpg


http://i264.photobucket.com/albums/ii197/hari317/MB220/IMG_4237.jpg


http://i264.photobucket.com/albums/ii197/hari317/MB220/IMG_4238.jpg


Regards,

Hari


PS: can you pls send some of that cold here?, Mumbai is like an oven 35deg plus humidity, uff!

Edited by hari317

In case you wish to write to me, pls use ONLY email by clicking here. I do not check PMs. Thank you.

Link to comment
Share on other sites

Here is an even poorer pic of the back of the section/nib

http://i827.photobucket.com/albums/zz194/english_john/004.jpg

Totally different to yours, but similar, I think , to the one in the review section.


The pens themselves seem to hold up after 30 years or so ... less worn than me


6 degrees now, I hope we don't have a frost!

Edited by English John
Link to comment
Share on other sites

Here is an even poorer pic of the back of the section/nib

...

Totally different to yours, but similar, I think , to the one in the review section.


John, can you point me to that review pls? I was only able to find a review for the 221.


Thanks!

Hari

In case you wish to write to me, pls use ONLY email by clicking here. I do not check PMs. Thank you.

Link to comment
Share on other sites

Create an account or sign in to comment

You need to be a member in order to leave a comment

Create an account

Sign up for a new account in our community. It's easy!

Register a new account

Sign in

Already have an account? Sign in here.

Sign In Now

Announcements


×
×
  • Create New...