Search the Community
Showing results for tags '3d-model'.
-
Hopefully this will be of interest for those wanting to "repair" by replacement the unrepairable components of vintage pens. This Conway Stewart from around 1950 has cross-linked changes to the polymer causing severe distortions and embritlement (see photograph). The lever-fill mechanism was completely unusable depite all the parts still being inside the barrel. I have had a basic level 3D printer for a couple of moths now and I have been impressed with the fine details that can be generated when the slower speeds and layer heights are used rather than the standard settings. This encouraged me to measure the complicated elements and print test parts to see if the cap threads and the jewel threads would be sufficiently accurate to work. The cap has a 4-start thread that secures it to the barrel with a simple twist. This has a lead of 2.5 mm per turn and, with 4-starts, the effective pitch is 2.5/4 = 0.625 mm. I then used the standard thread forms for ISO metric or Unified to prepare small test parts 1/2" or 12 mm long. The first attempt was far too tight so I kept the same thread form but put the 4 helical cuts deeper into the cap to give a greater than standard clearance. It only took this second test part to get a free running thread that was still very secure when tight. The barrel needs to hold a "J" shaped spring for the filler and has a fine groove to retain a 2-coil helical spring that positions the gold-plated lever in its socket. I printed the barrel first and persuaded the original springs to seat correctly in the new part. This let me fit an ink-sac and get writing. The cap required the female thread to be printed in the same way and had a simple single thread for the cap jewel. It seemed to be close to the dimensions for M4 x0.7p but again required the hole to have a more generous clearance than the metal standard. This cap jewel tightened well using some silicone gloves for grip and holds the gold-plated clip securely. The surface finish shows a texture which is a bit like a silky fabric. I decided to leave this texture rather than trying to sand smooth and polish to a finish. I will need to experiment with the best method to add a decorative gold-plated capring and possibly a printed securing band rather than a groove. The project was worthwhile, if only for the learning and process familiarisation.
- 51 replies
-
- 3d-model
- 3d printing
-
(and 1 more)
Tagged with:
-
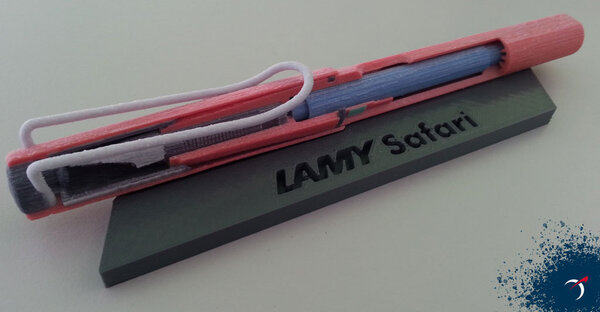
As exercise for a CAD software in 2018 I created a 3D-model of a Safari fountain pen. It's not perfect, but it was a fun thing to do. The model will be made public domain some time in the future. Here's a sneak preview of the model. I'll have to do some final work on the nib before it's ready. Each part can be places separately, like a real pen. And I'll convert it to a broadly used format.
-
From the album: LAMY Safari 3D
Lamy Safari 3D-Model Main Body Parts Animation© astronymus.net
- 3.31 MB
- x
-

3d-model powder_printed_2to1_20181213_125157.jpg
Astronymus posted a gallery image in FPN Image Albums


